Portfolio Pages

Saturday, September 28, 2013

More Landscape - this time in Ink. Plus Photos from an Inky Dark Night

Continuing the belated Spring 2013 Fiber Arts Degree posts:

After the intro to Landscape drawing, we embarked on a larger landscape project.
Outside. In early April.
It was still pretty nice outside and a lovely way to spend our morning class time.

The instructor walked us over to the Library complex and asked us to draw a part of that building - particularly the windows - including the reflections and whatever we could see inside. He also introduced us to drawing leaves in sunshine and shade.

After our sketch was setup, we were to consider the levels of shade involved and we were to paint our drawing with Indian Ink.
Did you notice the per-drop ink gradation test I did on
the right side of the watercolor paper?
I worked on this in my Cat-Free "Studio" - our backyard porch.
(You are correct. There was NO Way I was going to have glasses of watery Indian Ink available to the cats for sniffing, pawing, splashing, paw-printing....{shudder}.)

Obviously, my grasp of sun and shadow and, well, drawing in general still has quite a ways to go.
However, I decided playing with watered down Indian Ink required a fair amount of patience, was very meticulous, and rather fun. If it weren't for the due date, I could have worked on that landscape for a  month.

But I didn't have a month so this is what was turned in:


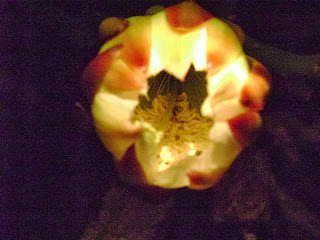
In a more current timeline, last month I realized one of our Night Blooming Cereus plants had blooms on the cusp of opening:


I stayed up late and went to look at the open blossoms...but...they weren't quite open yet.


Days later I was up late again and went to go look at the Night Blooming Cereus and it was blooming. At the time, I didn't connect my collecting a flashlight and the camera with the pictures I'd seen on the Touch the Wind blog in July, but his lovely nighttime bloom photos most likely did make an impression on my brain and inspire some of my photographs.

I took over 50 pictures - generally holding the flashlight between my knees and, at one point, fending off a large Sphinx Moth that may have felt I had loitered over his flowers for too long. {wry grin}
Here's a few of the keepers:
Did you notice the other insect in this photo shoot?
{Bottom, just off center - on the petal...}


Saturday, September 21, 2013

Adventures in Baby Knitting!

{Oh...well, not actually knitting a baby...knitting for a baby. Sorry.} {grin}

Last year, back when da Little Brother was personally trying out the patient-care in several hospitals around town, we got some nifty family news.

We were going to be gifted with another Great Nephew in November! (2012) So I got all sorts of inspired to try out knitting baby stuff!

As I recall, the baby arrived and I was nearly done with all the projects I'd started so I quickly washed everything and shipped it off a week or two late.

I started out with the "Easy Peasy Baby Jacket". 'Cept I made the vest version:


The Yarn is a Wool-Ease Tweed from my stash.

Next on the agenda...I wanted to try a "Baby Surprise Jacket" by Elizabeth Zimmerman.
This project was also part of my 2012 Ravellenic Games knitting and earned me Synchronized Stash Busting and Baby Dressage Medals.
{Medals can be viewed lingering on the right hand side of the blog page.} ;-)
I pulled two skeins of Classic Shades from my stash and set about knitting the interesting shape described in the pattern that would surprisingly fold into a jacket.
CooPurr "helped". 
And posed like an experienced Cat Model.
The colors laid out beautifully but I had some challenges with the pattern (where to place the markers confounded by counting challenges {sigh}) but the Baby Surprise Wiki Page on Ravelry was exactly what I needed to get back on track.
So - directed by EZ's pattern, I knitted the interesting shape:

 Which folds into this recognizable shape:
The seaming took me a couple of tries to make
the neck large enough and the shoulders even.
And then I pulled buttons from my button drawer and tried to decide which would work best on this small cardigan.

Buttons were applied to the Surprise Jacket and I looked around for a model to help me take pictures.
 

{Cat Statuary courtesy of the DH's Paternal Grandmother - who I didn't get to meet, but I think we would have liked each other.}

Last project - and the most challenging.
I'd picked up a fancy kit {I found out how fancy at the checkout counter {sigh-shame on me} at the LYS across town: the Lamb's Ear Cardigan.
But I have to say - the organic cotton in this kit was very yummy and I think there might be enough yummy yarn left over for another cardigan (hoodless).
I knit all the sweater pieces...

 And the hood and ears...

The sleeves confounded me a bit…the instructions were a bit light on construction guidance and didn't mention seaming up the sides. 

I checked the internet for errata or clues…nothing specific but the manufacturer’s website does say “pattern is written for a advanced knitter”. 
A more experienced knitterly friend answered my unformed question just as I had started knitting the sleeves in the round and I commented on the “light” finishing section of the pattern. She said the traditional way to seam up a baby sweater is - after you’ve knit the sleeves flat, to seam the sleeves from the cuff and then on down the sides of the sweater. Ohhhh. Ok.

Apparently I’m not an “advanced” knitter with traditional pattern background knowledge. Good thing my friends are! 

I discovered that long cast-on tails are really useful
during the seaming-up process. 
The seaming up went pretty well. 
Nikoli, the DH, & the ceramic cat helped helped me take pictures.


I consulted with an expert, Shepherd Susie, to find out if the ears I knit truly resembled a lamb's ear.
She said they were "Perfect". {grin}

I didn't knit anything for a newborn so timing wasn't much of an issue. I understand my youngest great-nephew was able to wear the Lamb Ear Cardigan last winter but it is more likely he'll might be big enough this year to wear more of the items I knitted. Some might even work for a couple o'three years. {grin}

Whups - belatedly, there were also some wee socks knitted for my newest great-nephew. The first pair  his Grandmother asked if she could give to...hmmm...to his new 2nd cousin {I think that's the relationship} so I knit this pair to send along with the cardigans & vest I've already described:

Thursday, September 19, 2013

No, wait - Conte IS Charcoal and a Published Drawing

Continuing the belated Spring 2013 Fiber Arts Degree posts:

After portraiture, the drawing class moved onto... Landscape!

Yep and I knew as much about that as I did about any other drawing topic. {wry grin}

And by then I had learned the teacher would send us off with a "draw this" experimentation vibe and after we gave it a shot he'd give us some instruction and we'd move forward.
So, when he sent us off to find some landscape and draw it...I just gave it a wild shot.
{S'ok, laugh if you need to}.
Sadly, my landscape skills didn't improve much even after instruction...it boggled me.
 

We were assigned to do a couple of smallish landscape drawings with Conte Crayons.
{sigh} I totally spaced that conte really is charcoal and I could have applied my semi-experience with Charcoal drawing but I did this instead. Ah, well.

I was pleased with the shading I did on the
top bricks...but otherwise...{sigh}
Moving on...

A side project was offered to the drawing classes to create a drawing to go with the winning short stories from the college writing contest. The highlight of that day - one of my classmates, a young lady who draws beautifully, found out her story had been one of the winning entries selected because it was in the pile of stories offered for us to review. She was so delighted! What a smile!

The instructor urged us to pick one of the winning entries and try creating an illustration to go with the story.
I knew it was a stretch for me and I was also aware that there were many other folks that could really draw and do a much better job on the art than I would. I made the teacher promise to offer the story I selected to other drawing students so my writer would have drawing options for his story.

I chose a story about a teacher making a regular visit to a prison to support the educational pursuits of the inmates. My drawing attempts were inspired by the description of the teacher's observations about the prison grounds, the student-inmates' desire to learn and how the students interact and support each other in the classroom, discarding prison pressures and prejudices away from the eyes of the other inmates.
Trying to draw barbed wire and razor wire with a
butterfly as one of the blades.

Trying to draw a book with razor wire book mark. 
Although I'm pretty sure they published all the drawings that were submitted, I was still very pleased that my drawing was included in the 2013 East Campus Writing Contest publication.


This is the drawing I submitted. An open book with a razor-wire bookmark casting a shadow of a butterfly.
Learning. Prison. The hope of metamorphosis.

I think education can change lives.
Blessings be.

Tuesday, September 17, 2013

Plaiting Paper instead of Hair

Continuing the belated Spring 2013 Fiber Arts Degree posts:

Once upon a time I had very long dark brown curly (aka "naturally tangled") hair. When unsprung, it stretched well past my waist. The best way to keep it from attacking innocent bystanders was to braid or "plait" it.

When I heard "Plaiting" as the next project in the Mixed Media class, I thought about my unruly hair.
{Which is much shorter now and hasn't attacked anyone in years.}

We've all seen plaited purses and baskets but did we think about making them?
Ok, I kinda did, but that is just an example of why I'm on the Fiber Arts journey....
But I didn't consider plaiting them with Paper.

In the first class about plaiting, we were given some yardage of paper - brown and white. We were to go home and cut the paper into strips and fold it like double-fold bias tape.

I went home, spread the old cardboard cutting mat on the living room floor and started measuring and cutting. {See, I don't just use the cutting mat for Treadmill reading!}

Of course...I had some help making my bias paper plaits. {sigh/grin}
(As always, please click on the picture to enlarge.)
Please note - enlarging will not improve the blurry pictures. The cats are just too fast for camera focus some times. (most times)


The short or mis-cut paper strips littered the floor of the house for a few weeks
{but nooooo, my cats aren't spoiled...}
CooPurr
Gryphon {at rest and not blurry!}
A few days later, I was back to class carrying (and trying not to crush) long strips of paper.

Our instructor had us do some basic plaiting, a la plain weave,

and then we went a bit free form and tried some turns and folds....
 

The instructor gave us some patterns to emulate, and after a false start, I got the hang of it and plaited this:
Yep, we use T-Pins to position the strips and keep them from wandering off and we perform the plaiting.

We were then ready to plot our large plaiting projects.
I had a concept to use calendar pages with a spacer and did a little testing of my concept with construction paper and magazine pages:

I liked the effect so I thought I'd try it with a page from an old Laurel Burch calendar:

Kinda cool but...uh...how does this make a Large Plating project?
What would I do with it/make from it?

Stumped, and inspired by a comment from the instructor, I played with the painted Pellon Interfacing from the Surface Design Play day.

And I wasn't particularly thrilled. {Ugh}
Neither was the instructor. She suggested some yarn be added....
{sigh} {Ugh-er}
I didn't feel this would get me a decent grade so I went back to my calendar-paper plaiting plot, stared at pictures on the Internet, and I ended up plaiting two small baskets.
(The Square basket is approx. 3" x 3.25 & 2.75" tall. The round basket has a diameter of 2.5 and is 3" tall)
The paper is from an old cat poster/calendar.
 

Yep, this is the paper from the Laurel Burch plaits I practiced upon earlier; cut even smaller. 

These small baskets didn't seem like much of a "Large" project, but I was out of time and presented them at the next class.
And I believe the instructor was rather impressed.
These two small baskets got me the "A" in my plaiting large project!
The view of the bottom of the baskets.


There's the numbers from calendar page - and
some of my to-do scribbles. 
You are correct, there is no glue used in this,
just a lot of tucking.
I am most fond of this wee Laurel Burch-ish basket. 


Apparently sometimes the small things can equal a viable large project.
And yes, I would like to try plating with other materials.

Tom Knisely Presentation

By the way, at the beginning of our plaiting sojourn, our instructor allowed me to skip a class {Thank you!} so I could attend the Tucson Handweaver's and Spinner's Guild meeting where Tom Knisely spoke about Loom Maintenance.
Mr. Knisely is an instructor at The Mannings Handweaving School in Pennsylvania {yes it is a wishful dream of mine to attend The Mannings}. He is also known for some books and especially two videos: "The Loom Owner's Companion" and "Weave a Good Rug".
It was a very informative and engaging presentation and I found him to be a charming, fun, and very knowledgeable speaker. He complimented our guild on it's organization, communication, outreach and our many Study Groups. {Woot!}

He started from the back of the loom and worked forward discussing the applicable loom maintenance. He suggested Silicon Spray as a lubricant for the metal parts and he likes Whatco Danish Oil (which appears to be available locally at Lowes & Home Depot) but he also commented that Howard's Feed-n-Wax "smells wonderful". He also suggested we give our loom a birthday and give it a thorough cleaning on that date.  I took pages and pages of notes that I will not repeat here. {Bet you're a little glad I won't type it all in here...}

Many questions were asked about a wide variety of looms and he appeared to be intimately familiar with each loom. Pretty spiffy! I didn't take the workshop he taught that week - partially because of the financial diet and mostly because {grin} I'm pretty sure I'm currently too weaving ignorant to attempt it.

My weaving class in the Fall semester is progressing. We've been learning how to setup the warp and put it on the loom. There is so much to learn.
This warp is actually Royal Purple. I have
no idea why it looks blue in this picture.